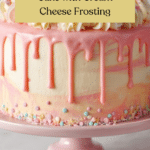
Pink Velvet Cake with Cream Cheese Buttercream Frosting Recipe
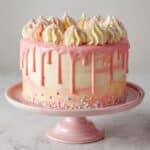
This Pink Velvet Cake Recipe is a stunningly beautiful layered cake featuring vibrant shades of pink cake layers made from a moist and tender batter. The layers are frosted with a rich and creamy cream cheese buttercream flavored with vanilla, creating a perfect balance of sweetness and tang. Using gel food coloring, the cake layers and buttercream are tinted in different pink tones for a visually striking presentation, decorated with piped heart shapes for a charming finish. Ideal for celebrations or special occasions, this Pink Velvet Cake combines classic flavors with a fun, colorful twist.
- Prep Time: 30 minutes
- Cook Time: 35 minutes
- Total Time: 1 hour 15 minutes
- Yield: 12-16 servings 1x
- Category: Dessert
- Method: Baking
- Cuisine: American
- Diet: Vegetarian
Ingredients
Scale
Cake Layers
- 3 cups cake flour (360g)
- 3 cups granulated sugar (600g)
- 2 1/2 tsp baking powder (10g)
- 1 tsp fine salt (6g)
- 1 cup unsalted butter, room temperature (226g)
- 1 cup carton egg whites or 7 large egg whites, room temperature (235g)
- 1 1/2 cups buttermilk, room temperature (360g)
- 2 Tbsp vegetable or canola oil (30g)
- 1 tsp vanilla extract or vanilla bean paste (4g)
- Pink gel food coloring
Cream Cheese Buttercream Frosting
- 2 cups unsalted butter, room temperature (452g)
- 1 cup cream cheese, room temperature (226g)
- 1 Tbsp vanilla extract or vanilla bean paste (12g)
- 1 tsp fine salt (6g)
- 11 cups powdered sugar (1375g)
- 1/4 cup heavy whipping cream, room temperature (60g)
- Pink gel food coloring
Equipment
- 4, 7-inch cake pans
- Spinning cake stand
- Electric hand mixer or stand mixer with paddle attachment
- 10-inch greaseproof cake board
- Serrated knife
- Large offset spatula
- Bench scraper
- 3 Small piping bags
- 3 Plastic couplers
- 3 Medium-sized round piping tips (like Wilton 10)
- 1 Small round piping tip (like Wilton 3)
Instructions
- Preheat and Prepare Pans: Preheat the oven to 350°F (175°C). Line four 7-inch cake pans with parchment rounds and grease them with non-stick baking spray or homemade pan release to prevent sticking.
- Combine Dry Ingredients: In a stand mixer or with a hand mixer, blend together 3 cups cake flour, 3 cups granulated sugar, 2 1/2 tsp baking powder, and 1 tsp salt until fully combined to create the dry base of the batter.
- Add Butter: Slowly mix in 1 cup room temperature unsalted butter on low speed until the mixture resembles moist sand with no large butter chunks visible.
- Mix in Egg Whites: Pour in 1 cup room temperature egg whites and mix on low until just incorporated, scraping the bowl sides and bottom as needed to ensure even mixing.
- Add Wet Ingredients: Add 1 1/2 cups buttermilk, 2 Tbsp vegetable oil, and 1 tsp vanilla extract. Mix on low until fully incorporated, then scrape down the bowl once more and beat on medium speed for about 30 seconds to lighten the batter. Expect a thin batter consistency.
- Divide and Color Batter: For four 7-inch layers, divide batter into two bowls (~900g each). Add pink gel food coloring to one bowl to create a light pink and to the other for a deeper pink shade. For three 8-inch layers, divide into thirds (~600g each) and color accordingly.
- Fill Cake Pans: Evenly pour the colored batters into the prepared cake pans to create alternating shades of pink layers. Use a kitchen scale for equal portions to ensure uniform baking and height.
- Bake the Cake Layers: Bake for 33-37 minutes, or until a toothpick inserted comes out with just a few moist crumbs. Rotate the pans halfway through baking for even cooking.
- Cool the Cake Layers: Allow pans to cool for 10 minutes, then run a small offset spatula around the edges to loosen the cakes. Transfer the pans to the freezer for 30 minutes to accelerate cooling.
- Remove and Level Layers: Once fully cooled, invert pans to remove cake layers. Use a serrated knife to level tops and remove any caramelized edges. Optionally, horizontally torte the layers to create thinner cake layers.
- Frosting Preparation: In a stand mixer bowl, beat 2 cups room temperature unsalted butter and 1 cup cream cheese on medium speed for 30 seconds until smooth and creamy.
- Add Flavor and Sweeteners: Mix in 1 Tbsp vanilla extract and 1 tsp salt on low speed, then gradually add 11 cups powdered sugar and 1/4 cup heavy whipping cream. Continue mixing on low speed until the frosting reaches desired consistency.
- Adjust Consistency: If frosting is too thick, add additional heavy cream 1 Tbsp at a time. If too thin, add powdered sugar in 1/4 cup increments. Cover frosting with plastic wrap to prevent crusting.
- Assemble Cake: Place one cake layer on a greaseproof cake board using a dab of frosting to secure it. Spread an even layer of buttercream between each cake layer with an offset spatula, stacking all layers.
- Crumb Coat and Chill: Apply a thin crumb coat of frosting over the entire cake. Smooth sides with a bench scraper. Chill the cake in the fridge for 30 minutes or freezer for 10 minutes until frosting firms.
- Final Frosting Layer: Apply a thicker layer of frosting smoothly over the chilled cake using a bench scraper for clean edges and surfaces.
- Color Buttercream for Decoration: Divide remaining buttercream into three portions and tint each with pink gel food coloring in varying shades. Place each color into separate piping bags fitted with plastic couplers and medium round piping tips.
- Decorate the Cake: Use a small heart-shaped cookie cutter to guide piping. Pipe hearts on the cake with colored frosting, then switch to a smaller round tip to add dots and small hearts filling gaps for a decorative finish.
- Serve or Store: Serve your pink velvet cake immediately, or store in the fridge for up to one week. It can be kept at room temperature for a few hours before serving.
Notes
- Using cake flour and room temperature ingredients ensures a tender crumb and smooth batter.
- The batter is intentionally thin; this is normal for a moist pink velvet cake.
- Freezing cake pans to cool layers speeds the process and stabilizes cakes for easier handling.
- Leveling and torting layers is optional but creates a more elegant, thinner layered cake.
- Adjust the intensity of pink by adding gel food coloring gradually.
- Color the buttercream after filling and crumb coating to maintain smooth texture.
- Decorative piping with hearts adds a whimsical, personalized touch to the cake.
- This cake can be assembled a day ahead and stored in the fridge for convenience.
- Ensure cake layers are still slightly cold when assembling for easier frosting application.
Keywords: Pink Velvet Cake, layered cake, cream cheese frosting, pink cake, celebration cake, vanilla cake, Valentine's Day cake