Espresso Cheesecake Recipe
Introduction
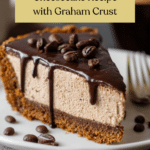
Espresso Cheesecake is a delightful dessert that combines rich, creamy cheesecake with the bold flavor of espresso. Perfect for coffee lovers looking for a unique twist on a classic treat.

Ingredients
- 16 oz cream cheese, softened
- 1 cup sugar
- 3 large eggs
- 2 teaspoons espresso powder
- 1 prepared graham cracker crust
Instructions
- Step 1: Preheat your oven to 325°F (160°C). In a large bowl, beat the cream cheese until smooth. Gradually add the sugar and continue to beat until well combined. Mix in the eggs one at a time, then stir in the espresso powder until evenly distributed.
- Step 2: Pour the cheesecake batter into the prepared graham cracker crust, smoothing the top. Bake for about 45-50 minutes, or until the center is almost set but still slightly jiggly. Remove from oven and let cool to room temperature. Chill in the refrigerator for at least 4 hours before serving.
Tips & Variations
- For a stronger coffee flavor, add an extra teaspoon of espresso powder or swirl in some cooled brewed espresso before baking.
- Try topping with whipped cream and a dusting of cocoa powder for a decorative finish.
Storage
Store the cheesecake covered in the refrigerator for up to 5 days. For longer storage, wrap tightly and freeze for up to 1 month. Thaw overnight in the fridge before serving. Reheat is not recommended as it can affect the texture.
How to Serve
Serve this delicious recipe with your favorite sides.
FAQs
Can I use instant coffee instead of espresso powder?
Yes, instant coffee can be used as a substitute, but espresso powder will provide a richer and more authentic coffee flavor.
How do I know when the cheesecake is done baking?
The cheesecake is done when the edges are set and the center is slightly jiggly but not liquid. It will firm up as it cools and chills.
PrintEspresso Cheesecake Recipe
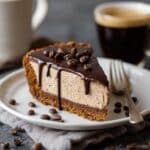
This rich and creamy Espresso Cheesecake combines the bold flavors of espresso with the smooth texture of classic cheesecake. Set on a crunchy graham cracker crust, this dessert is perfect for coffee lovers looking for a decadent treat with a perfect balance of sweet and slightly bitter notes.
- Prep Time: 15 minutes
- Cook Time: 55 minutes
- Total Time: 5 hours 10 minutes
- Yield: 8 servings 1x
- Category: Dessert
- Method: Baking
- Cuisine: American
Ingredients
Cheesecake Batter
- 24 oz (680g) cream cheese, softened
- 1 cup (200g) granulated sugar
- 3 large eggs
- 2 tablespoons espresso powder
Crust
- 1 graham cracker crust (9-inch)
Instructions
- Prepare the batter: In a large mixing bowl, beat the softened cream cheese until smooth and fluffy. Gradually add the sugar and continue to mix until fully combined. Add the eggs one at a time, blending well after each addition. Finally, stir in the espresso powder until evenly distributed throughout the batter.
- Pour into crust: Pour the prepared cheesecake batter evenly into the 9-inch graham cracker crust, smoothing the top with a spatula to ensure an even surface.
- Bake until set: Preheat your oven to 325°F (163°C). Place the cheesecake on the middle rack and bake for approximately 50-60 minutes, or until the edges are set and the center slightly jiggles when gently shaken.
- Chill: Remove the cheesecake from the oven and allow it to cool to room temperature. Then refrigerate for at least 4 hours or overnight to let it fully set and enhance the flavors before serving.
Notes
- To make espresso powder if unavailable, grind finely instant espresso granules.
- Ensure cream cheese is softened to room temperature for a smooth batter without lumps.
- Use a water bath during baking for a creamier texture without cracks.
- Serve with whipped cream or chocolate shavings for an extra indulgent touch.
Keywords: espresso cheesecake, coffee cheesecake, graham cracker crust dessert, creamy cheesecake, baked cheesecake