Easy Gluten Free English Muffins Recipe
Introduction
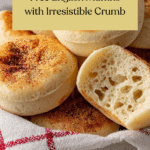
These easy gluten free English muffins are soft, chewy, and full of delightful nooks and crannies. Made with a simple blend of gluten free flours and psyllium husk, they’re perfect for breakfast or snacks. Enjoy homemade muffins that rival store-bought versions without any gluten.

Ingredients
- 20 g (4 tbsp) whole/rough psyllium husk (or 17 g psyllium husk powder)
- 360 g (1½ cups) lukewarm water
- 160 g (1⅓ cups + 1 tbsp) tapioca starch (or cornstarch, potato starch, arrowroot starch)
- 140 g (1 cup + ½ tbsp) millet flour, plus extra for flouring surface (or finely milled brown rice flour)
- 120 g (¾ cup + 3 tbsp) sorghum flour (or light buckwheat, white teff, or oat flour)
- 25 g (2 tbsp) caster/superfine or granulated sugar
- 8 g (2½ tsp) instant yeast (or 10 g active dry yeast)
- 8 g (1½ tsp) salt
- 120 g (½ cup) whole milk, lukewarm
- 20 g (1½ tbsp) sunflower oil or other neutral oil
- 10 g (2 tsp) apple cider vinegar
- Cornmeal, for dusting
Instructions
- Step 1: In a bowl, mix the psyllium husk with lukewarm water. After 30-45 seconds, a gel will form.
- Step 2: Whisk together tapioca starch, millet flour, sorghum flour, sugar, instant yeast, and salt in a large bowl or stand mixer bowl.
- Step 3: If using active dry yeast, activate it by mixing with sugar and milk. Let it foam for 5-10 minutes before adding to dry ingredients.
- Step 4: Add milk, oil, and vinegar to the psyllium gel and mix well.
- Step 5: Make a well in the dry ingredients and pour in the psyllium gel mixture.
- Step 6: Knead the dough until smooth and fully combined, scraping the sides to avoid dry patches. The dough will be slightly sticky.
- Step 7: Sprinkle a baking sheet with cornmeal. Turn dough onto a floured surface, knead lightly, then divide into eight equal portions (~125g each).
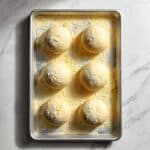
- Step 8: Shape each portion into a ball, place on the cornmeal, and gently press to flatten to about 1¼ inches (3 cm) thick. Sprinkle tops with cornmeal.
- Step 9: Cover with plastic wrap and proof in a warm place for about 1 hour, until doubled in size. For a cooler kitchen, create a warm humid environment by placing a cup of boiling water in your turned-off oven.
- Step 10: Heat a large cast iron skillet or frying pan over low heat until gently warm. Do not grease the pan.
- Step 11: Carefully transfer the muffins to the pan (cook 4 at a time if needed). Cook over low heat for 11-12 minutes until deep golden brown on the bottom. Cook uncovered.
- Step 12: Flip and cook the other side for another 11-12 minutes until golden and cooked through.
- Step 13: Transfer muffins to a wire rack and cool completely before splitting and serving. Use a fork to split them to maximize the classic texture.
- Step 14: Wait at least 1 hour for muffins to cool fully; eating warm muffins will result in a sticky interior.
Tips & Variations
- Substitute flours as noted to suit availability or dietary preferences.
- Resist adding extra flour during kneading to prevent dense, dry muffins.
- Proof in a warm, humid area by placing boiling water in the turned-off oven for best rise.
- Cook on low heat to ensure muffins cook through without burning.
- Split muffins with a fork, not a knife, to keep the airy texture.
Storage
Store cooled muffins in a closed container at room temperature for 2-3 days. For best taste, toast them before serving. These muffins are best enjoyed fresh but freeze well if you want to keep them longer.
How to Serve
Serve this delicious recipe with your favorite sides.
FAQs
Can I use different flours for this recipe?
Yes, you can substitute millet flour with finely milled brown rice flour, and sorghum flour with light buckwheat, white teff, or oat flour, depending on your dietary needs and preferences.
Why should I let the muffins cool completely before eating?
Cooling allows the crumb to set properly. Eating muffins while still warm can result in a sticky and gummy texture inside. Waiting at least an hour ensures the best texture and flavor.
PrintEasy Gluten Free English Muffins Recipe
These Easy Gluten Free English Muffins are soft, tender, and packed with a delightful crumb full of nooks and crannies perfect for holding butter and jam. Made without gluten-containing flours, they incorporate psyllium husk for texture, a blend of gluten-free flours, and a no-fuss stovetop cooking method that yields golden-brown muffins with a chewy interior. Ideal for those following a gluten-free diet, these English muffins are perfect toasted or fresh and can be made using common pantry ingredients.
- Prep Time: 25 minutes
- Cook Time: 25 minutes
- Total Time: 1 hour 50 minutes
- Yield: 8 English muffins 1x
- Category: Bread
- Method: Stovetop
- Cuisine: British
- Diet: Gluten Free
Ingredients
Dry Ingredients
- 20 g (4 tbsp) whole/rough psyllium husk (If using psyllium husk powder, use 17 g)
- 160 g (1 cup + ½ tbsp) millet flour, plus extra for flouring surface
- 120 g (¾ cup + 3 tbsp) sorghum flour
- 160 g (1½ cups) tapioca starch (or equal weight cornstarch/cornflour, potato starch or arrowroot starch)
- 25 g (2 tbsp) caster/superfine or granulated sugar
- 8 g (2½ tsp) instant yeast (or 10 g active dry yeast)
- 8 g (1½ tsp) salt
Wet Ingredients
- 360 g (1½ cups) lukewarm water
- 120 g (½ cup) whole milk, lukewarm
- 20 g (1½ tbsp) sunflower oil or other neutral oil
- 10 g (2 tsp) apple cider vinegar
Other
- Cornmeal, for dusting
Instructions
- Make the Psyllium Gel: In a bowl, mix the psyllium husk with lukewarm water. Stir and wait 30-45 seconds until a gel forms, which will help give structure to the dough.
- Mix Dry Ingredients: In a large bowl or the bowl of a stand mixer fitted with a dough hook, whisk together tapioca starch, millet flour, sorghum flour, sugar, instant yeast, and salt until evenly combined.
- Prepare Yeast (if using active dry): If active dry yeast is used, activate it by combining with sugar and lukewarm milk. Let it sit for 5-10 minutes until frothy before adding to dry ingredients.
- Combine Wet Ingredients: Add milk, oil, and apple cider vinegar to the psyllium gel and mix thoroughly to form a homogeneous liquid mixture.
- Form the Dough: Make a well in the dry ingredients and pour in the psyllium gel-wet mixture. Knead with a dough hook or by hand until smooth, supple, and slightly sticky, ensuring no dry flour patches remain. Avoid adding extra flour.
- Shape & Proof: Lightly dust a large baking sheet with cornmeal. Turn the dough onto a floured surface, knead lightly, and divide into eight equal portions (~125 g each). Shape each into a smooth ball, place on the cornmeal, and gently flatten to about 1¼ inch (3 cm) thick. Sprinkle tops with cornmeal. Cover with plastic wrap and proof in a warm area for about 1 hour or until doubled in size. For cold kitchens, create a warm proofing environment with a cup of boiling water in a switched-off oven.
- Preheat Cooking Surface: Heat a large cast iron skillet, frying pan, or griddle over low heat until warm to the touch a few centimeters above the surface. Do not grease the pan.
- Cook English Muffins – Side One: Carefully transfer the proved muffins to the skillet, working in batches if necessary. Cook uncovered over low heat for 11-12 minutes until deep golden brown on the bottom.
- Cook English Muffins – Side Two: Flip the muffins with a spatula and cook the other side for an additional 11-12 minutes until equally golden and cooked through.
- Cool Completely: Transfer muffins to a wire rack and allow to cool completely at room temperature for at least 1 hour. This cooling step helps the crumb set and prevents a sticky interior.
- Serve: Split muffins with a fork to create maximum nooks and crannies. Enjoy toasted or fresh with your favorite toppings.
Notes
- Use whole/rough psyllium husk for best texture; if using powder, reduce quantity.
- If using active dry yeast, activate it first in milk and sugar before mixing.
- Cook muffins on low heat to ensure they cook fully without burning.
- Do not add extra flour to dough to avoid dense, dry muffins.
- Allow muffins to cool completely before splitting and serving to avoid sticky interiors.
- Store in a closed container at room temperature for 2-3 days; toast before serving for best texture.
- Use cornmeal to dust baking sheet and muffin tops for a classic texture and non-stick surface.
- Can substitute flours as indicated for dietary preferences or availability.
Keywords: gluten free English muffins, gluten free bread, psyllium husk bread, stovetop muffins, breakfast bread, easy gluten free baking